

View Article
BLOG
How to Set Up Custom Channel Groupings in Google Analytics
In Google Analytics you have the option of using the Default Channel Groupings and Custom Channel Groupings.
What’s the difference?
Custom channels are rules you set on how your traffic is grouped in Google Analytics.
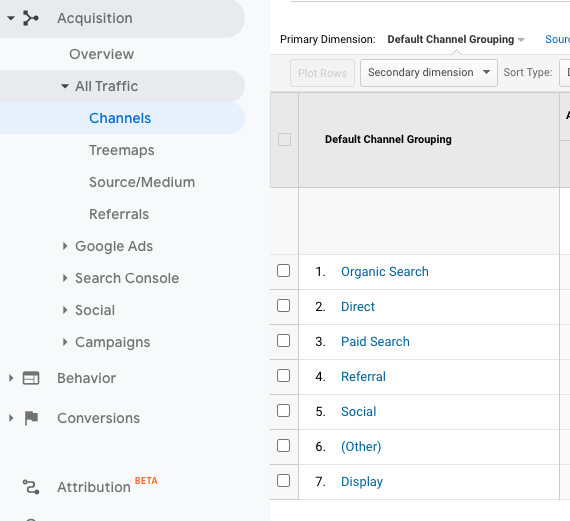
Default channels are pre-set in Analytics. You can view channel groupings under Acquisition -> All Traffic -> Channels.
Default channel groupings include:
- Organic search
- Direct
- Referral
- Display
- Social
- Affiliates
- Paid search
- Other
What can you do with custom channel groupings?
- Change the way traffic is grouped for easy analysis of data.
- Gain more information on the performance of marketing channels that are important to your business.
While Google Analytics default channels are a useful starting point, they are a one-size fits all model. Based on what’s important to your business, you should customise your channel groupings. This will give you richer and more relevant data. For example, you may want to see how different SEM campaigns are performing and which are bringing in the most traffic. Or you could be interested in comparing your paid and organic traffic. The default channels don’t allow you to easily see this information.
Before you set them up, you need to know.
Don’t edit your Default Channel Groupings
When you edit the default channel groupings, you permanently change how incoming traffic is classified. This is not applied retroactively, so the historical data won’t change. Instead of adjusting the default channel groupings, you should set up new custom channels.
Custom Channel Groupings are retroactive
Unlike default channel grouping, once set-up, the custom definitions will apply retroactively to all historical data. For example, if you split your Organic search into Organic Search (Branded) and Organic Search (General), this definition will be applied to previous data to allow you to see types of searches that have been bringing in most traffic organically.
Start broad then go more granular
You may be tempted to break down your traffic sources into 15+ channels, thinking this will give you more data and information to work with. Instead, it’s better to start on the broader side. This makes it easier to review your groupings and break them out further later on.
As a starting point look at the default channels and the data that is going into the “other” channel. If there is a lot of data, you may see that some of it is actually from relevant channels you want to track. Try adding two or three new channel definitions alongside the default predefined rules and go from there.
Other should be the smallest channel
Ultimately you want your “Other” channel to have very little data.
Why?
Because this means you have covered all bases. If your “Other” category is small, most of your traffic is falling into one of the other channels you set up.
Remember this may take some time and refining, so don’t stress if you’re still seeing a lot of data in the “Other” section.
No Automation into Data Studio
Unfortunately, there is no way to automatically import your custom channels into data studio reports. To do this you will need recreate your channel groupings directly in Data Studio.
Understanding Google Analytics Terms
Source: The origin of the traffic (such as Google, Facebook, Direct).
Medium: The type of traffic (such as Organic, Referral, Paid).
Channel: Rule-based grouping of traffic.
Campaign Name: The name of your Google Ads campaign.
Landing Page: Page through which visitors entered the site.
How to set up Custom Channel Groupings
To set up the custom channels you will need to manually enter rule definitions.
Where to Access
Visit Admin -> View (all website data) -> Channel Settings -> Channel Groupings.
You will see the Default Channel Groupings are set here. Don’t edit this.
Click + New Channel Grouping.
Name: “Custom Channel Grouping”.
Defining Your Channels
1. Name each channel and define the rule (see below for rule examples)
- These conditions are usually based on dimensions in Google Analytics.
- Some common dimensions you may use to create your rules are Source, Medium, and Landing page.
2. Ensure Custom UTMs are set-up and used correctly
- These will add parameters such as Source and Medium to customised URLs.
- It is important that the parameters are used consistently as these need to match the rules you create in your custom channels.
- For example, if tracking paid social media, you would want to set the Campaign Medium to “paid”, in your custom UTM.
- This is because later the rule for Social (paid) includes:
- “medium must contain paid”.
- For more information on UTM tracking visit Google’s support article.
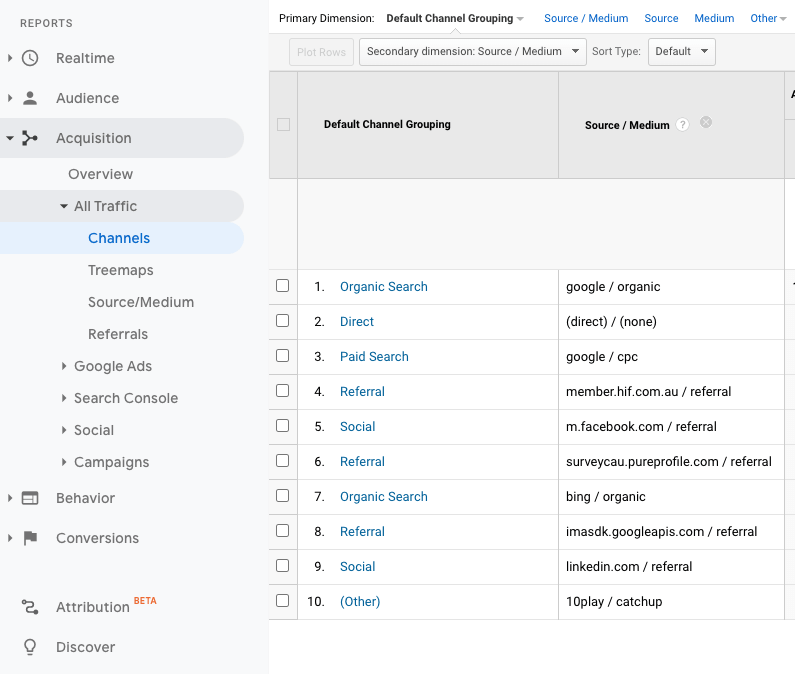
3. Use Default Channels as a reference point
- If you are confused about how to define channels, you can look at the default channels and use the Secondary dimension view to see what the existing parameter is.
- For example, add Source/Medium as a second dimension in your default channel view.
- You will see the source for Social (such as m.Facebook.com, linkedin.com) and the medium (referral).
- This can be a helpful reference point if you get confused with setting up the rules.
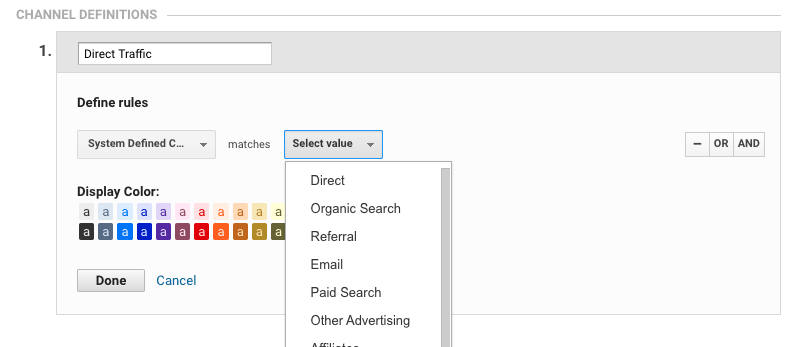
4. Use System Defined Channels
- If you want to include some of the default channels in your custom grouping you can set this using the rule “System Defined Channel” matches ______.
5. Understand how regular expressions work
- To create your rules, it is a good idea to use regular expressions (RegEx*).
- These allow you to create more flexible definitions.
- Essentially this will just help ensure that your channel rules are working they should, by allowing more variations of the terms you enter.
- For more information see Google’s Support Article.
Examples of rule definitions
Note: these may need to be customised based on your own account and UTM tracking.
| Direct |
Source exactly matches direct AND Medium exactly matches (not set) OR Medium exactly matches (none)
|
| Organic (Branded) |
Medium exactly matches organic AND Query type matches Brand
|
| Organic |
Medium exactly matches organic
|
| Paid Search (Branded)
|
Medium matches regex ^(cpc|ppc|paidsearch)$ AND Source matches regex ^(google|bing)$ AND Query Type matches Brand
|
| Paid Search (Generic) |
Medium matches regex ^(cpc|ppc|paidsearch)$ AND Source matches regex ^(google|bing)$ AND Query Type matches Generic
|
| Social (Paid) |
Medium matches regex ^(cpc|ppc|paid)$ AND Source matches regex ^(facebook|linkedin|twitter|instagram)$
|
| Social (Organic) |
Medium matches regex ^(social|social-network|social-media|sm|social network|social media|referral)$ AND Source matches regex ^(facebook|linkedin|twitter|instagram)$
|
|
Medium exactly matches email
|
|
| Display
|
Medium matches regex ^(display|cpm|banner|cpc|ppc|paid)$ OR Ad Distribution Network exactly matches Content
|
| Referral |
Medium matches regex ^(referral)$
|
Set-up Your Custom Channels in a Hierarchy
When you set up the custom channels the order is important.
All of the data will fall into the first definition you set. If it doesn’t match these rules it will go to the next one. If it goes through all of your channel rules and doesn’t match any, it will fall into the “Other” channel. So, start with the most exclusive category in your hierarchy, such as direct traffic. You don’t need to add a channel for “Other” as this will apply automatically.
Set-Up Branded vs. Non-Branded Keywords
Say you want to track how many people are coming to your site organically via a branded search and a non-branded search. In this case, you would want to create two channels Organic (general) and Organic (branded).
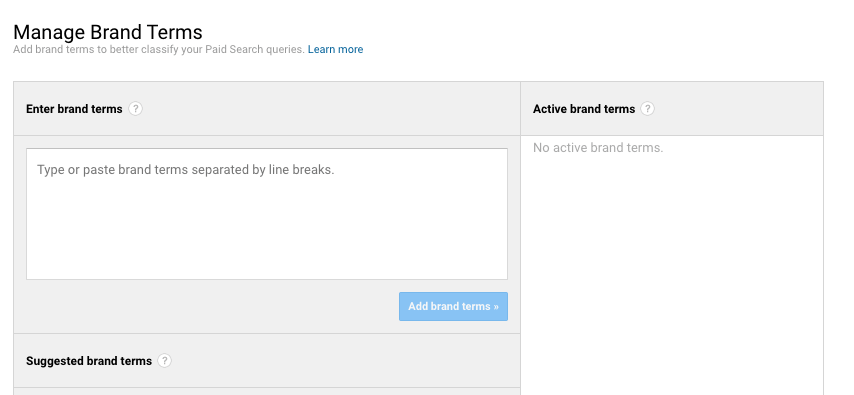
Before you can create your rule, you need to set up branded keywords in Google Analytics.
To do this, visit Admin -> Channel Settings -> Manage Brand Terms.
Here you can enter your brand terms. This is not case sensitive, so you don’t need to add capitalisation variations. You can however include common misspellings.
Then you can set your custom channel rule as follows:
Medium exactly matches organic
AND
Query type matches Brand.
Ensure that your Organic Search (general) rule is below this to maintain the correct hierarchy. This ensures that data that does not match the Brand query will fall into the Organic Search (general) rule.
Save And Apply Your Custom Channel
Once you have set all of your rules you can save your new custom channel. It says it may take up to 24 hours to apply, but usually, you can instantly see your data.
To view your new channel groupings, go to Acquisition -> All Traffic -> Channels.
You should see Primary Dimensions: Default Channel Groupings. If you click on this, it will have a drop-down where you can select your custom grouping.
Check that the data is correct and if not, you may need to adjust some of your rules. Remember you can use the secondary dimension to view the different parameters for your channels to help you troubleshoot any issues.